


One of the most important functions to consider when planning an Azure Virtual Desktop infrastructure is host scaling. Azure compute resource costs will, in most cases, be far and away the largest proportion of your monthly spend, so ensuring that the environment is scaled up and down depending upon requirements can drastically reduce your monthly bill.
Microsoft now provides scaling plan functionality within the Azure portal, but while this is a welcome addition, it can’t compete with the intelligence, flexibility and simplicity offered by Nerdio Manager’s built-in Autoscaling tools. In this blog, I want to briefly review how Autoscaling works and take a look at some of the options available to ensure your AVD environment is running as efficiently as possible
Scaling Logic
Within the Nerdio Autoscaling console, Nerdio offers many flexible options to build scaling rules. As rules can be based upon ‘CPU usage’, ‘Active sessions’, simple ‘spare host’ requirements and the ‘user-driven’ start-on-connect feature. I’m going to focus on two options in particular: ‘Available Sessions’ and the new ‘RAM Usage’ option.
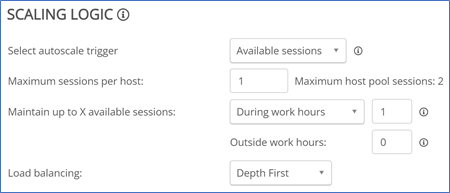
The below screenshot shows settings available for the ‘Available Sessions’ function. Here, we can see for my simple test environment that we are restricting maximum session per host to 1. In this environment, I am provisioning 2 hosts, one of which will be off unless required by the specified scaling rules. The option to maintain 1 available session means that once a session has been consumed on host, the system should move to make another session available by starting the second host.
After putting these rules into effect, we can see that a single host is started in order to make 1 free session available. In the screenshot below we can see the Auto-scale action shown on the Autoscale History page. The graph shows that our active hosts increased from 0 to 1, and the reason for the increase.
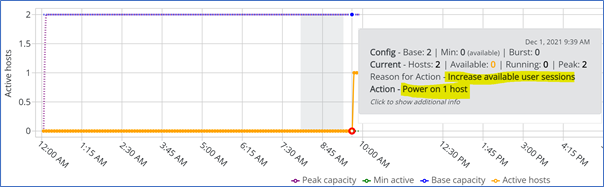
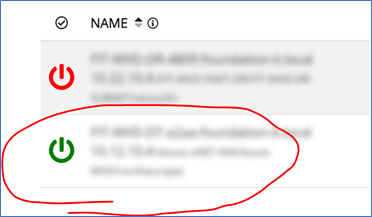
From the hosts page, we can also see that a single host is shown as on (green).
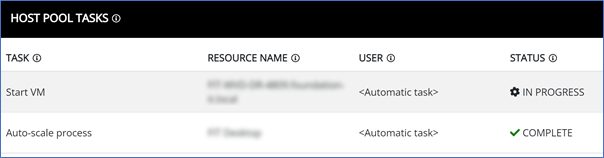
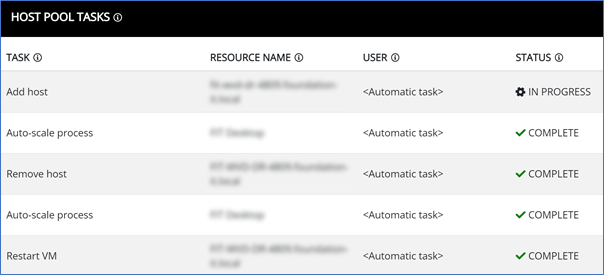
After I log into a desktop, the Autoscale process starts automatically. In this instance, where we are polling based on available sessions, there was a 3-5 minute delay before the process kicked off. The Host Pool tasks pane shows the activity…
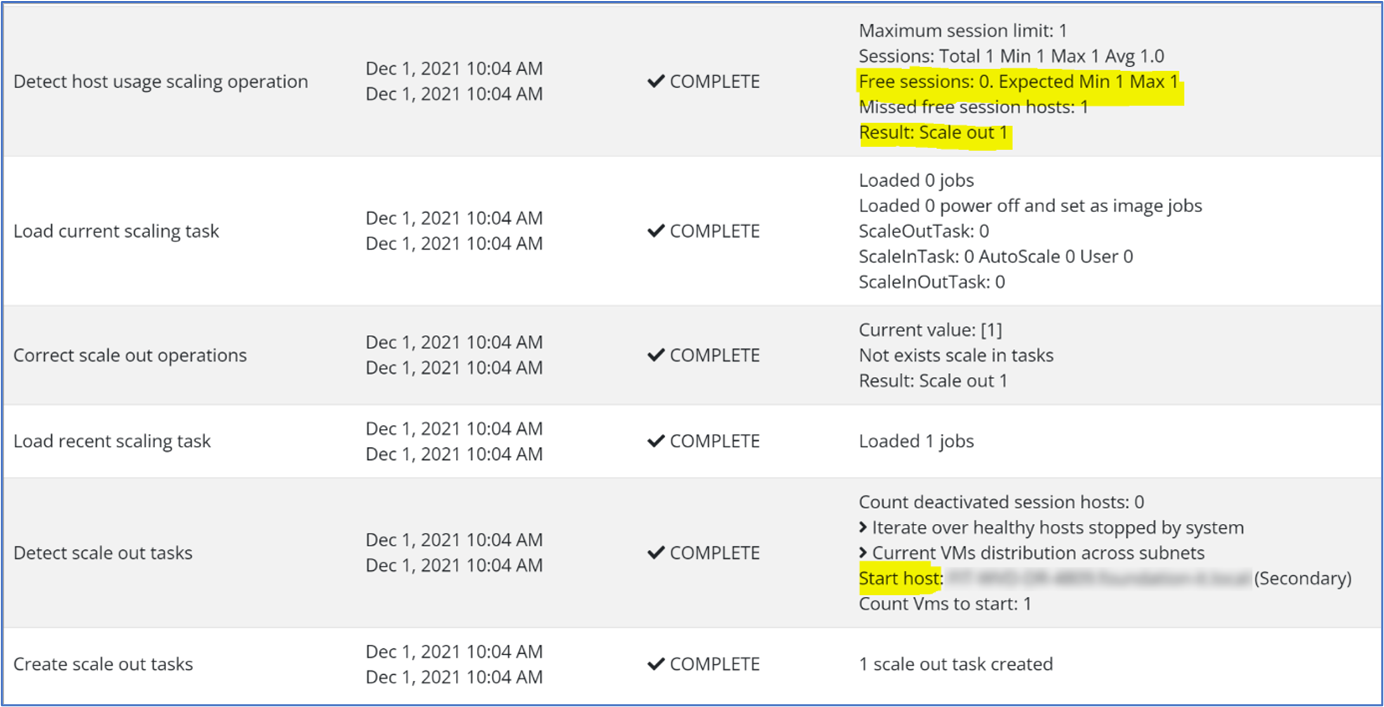
And from the details tab of the task we can see the logic of the action, showing that the minimum sessions threshold is not met, so a host should be started…
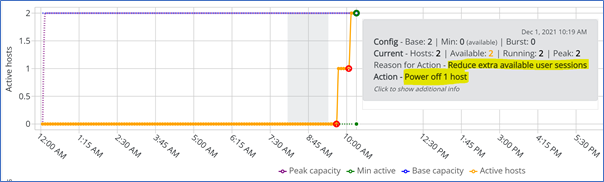
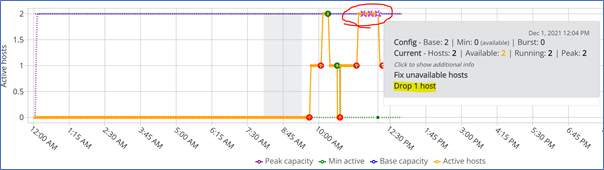
This information is also shown in graphical form on the Autoscale History page, where we can clearly see the host increase action, and the reason for it…

Similarly, a few minutes after logoff and due to our aggressive scaling rules, we see the autoscale process run and a scale in task created

From the Auto Scale history page, we see the action and the reason…
We can see that the available session options work to reduce resource usage and therefore cost, but it doesn’t necessarily ensure a good user experience. If multiple users are connected to a host, the main variable which affects user experience is often RAM availability.
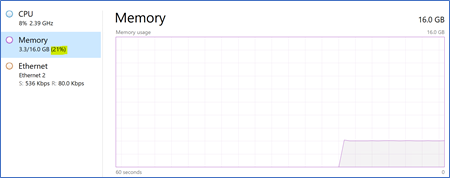
So, let’s try out a different metric; the ‘RAM usage’ option. From the Azure console, I can see that our VM has around 15% committed RAM with no users logged in...
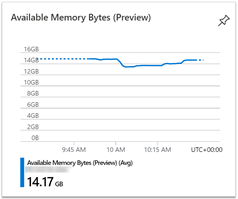
With a user logged in, the average memory use of a single session rose to just over 20% (remember, this is quite a small host!)
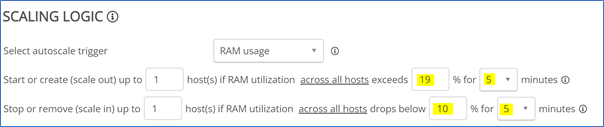
For the purposes of this demonstration, I kept the margins of the scaling logic quite tight, in order to force the scale process. So we have our scale in metric set to <10% usage and our scale-out metric set to >19%. I also selected the smallest scale audit window of 5 minutes. I needed to reduce the minimum usage in the scale in section to below the machine’s idle usage, otherwise it would shut down all active hosts. Again, this is a synthetic test to force the actions, and would likely not be seen outside the test lab. In a production environment, we would remove the idle RAM restriction and set scale in rules to prevent the shutdown of all hosts during working hours.
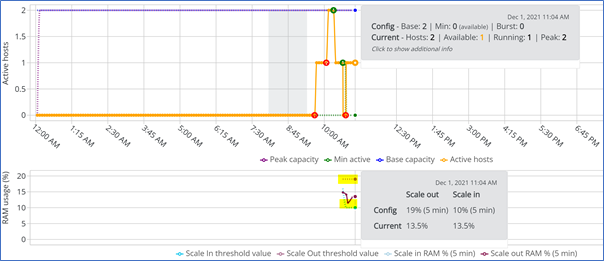
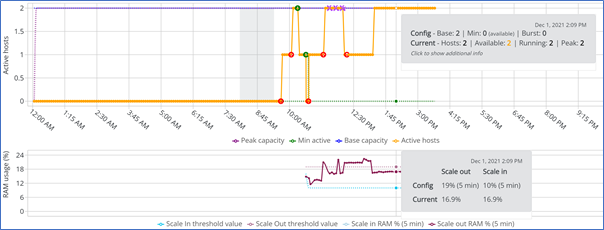
Once active, the Ram Usage graph on the Autoscale History page comes into play, showing resource usage as compared to the configured scale rules. With no users connected, we can see that the usage is sitting comfortably between the two scale triggers…
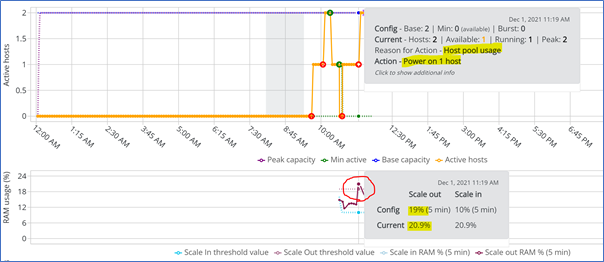
After logon, as expected we can see the scaling rules swing into action and increase our host count in order to meet our available RAM requirement…
Nerdio allows us to manage, track and audit intelligent and complex scaling rules in a simple, intuitive way, and provides a range of scaling option to suit your requirements, including week-day only rules and the option to apply multiple rulesets to a pool.
Auto Heal
Session hosts may from time-to-time encounter connectivity issues which require remediation. As luck would have it, I experienced this exact problem when writing this blog. The Auto-heal feature attempts to resolve connectivity issues through system restarts. If it is unsuccessful, it can automatically rebuild the host.
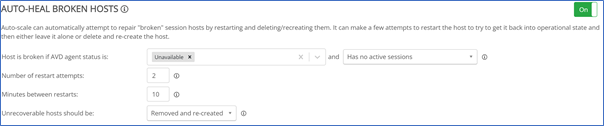
We can see from the Autoscale history that 3 maintenance operations have occurred – 2 restarts and then a deletion of the broken host.
These activities can also be seen from the host pool tasks page
After the new machine has been built, its kept on due to the RAM usage rules we configured previously.
And there you have it, the fully automated removal and recreation of a broken host, with a full audit trail, without any requirement for administrative interaction.

About the Author: Toby Skerritt
Toby has been with Foundation IT for 10 years and is our Principal Consultant. In addition to his 10-year stint, he is an End User Compute / Azure Virtual Desktop specialist who loves music, technology and Southampton FC.